AN ART LESSON INSPIRED BY THE CULTURE OF INDIA
I’ve taught this lesson to my upper elementary students for a few years now, as part of a cultural-based unit on India.
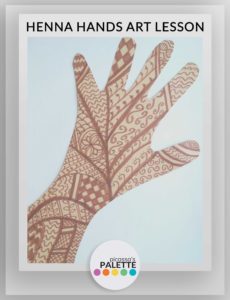
The students are provided with examples of symbols commonly found in Mehndi Hand Artwork.
This exposes them to the idea that art can represent the cultural tradition of a community.
(VA: Cn10.1.4 Create works of art that reflect community cultural traditions.)
Once students form an understanding this concept, they have a foundation for creating art that reflects their own traditions and cultural identity through projects such as this mixed media lesson: Past and Future Mixed Media Hands Project from A Space To Create.
ABOUT HENNA HANDS
Henna hand art is also known as Mehndi.
Mehndi hand decorating is part of Indian heritage. It is a special tradition that is done in celebration of special occasions, like weddings and birthdays.
Henna is a plant that is dried out and ground up to make an ink paste. Then, it is pushed through a pen-shaped tube as the artist creates detailed designs.
This art is applied directly to the skin, typically onto hands and feet.
One of the most common questions students have is this, “Does it ever come off?”
The Henna paste dyes skin, but it is not permanent. Just like a temporary tattoo, the ink fades after about a week.
THE HENNA HANDS ART LESSON
DIRECTIONS
The instructions are given using FOUR steps.

The first step uses a precut template, that students use to trace. By positioning the right angle of the arm against the corner of the paper, students can fit the template to a standard sized piece of construction paper.
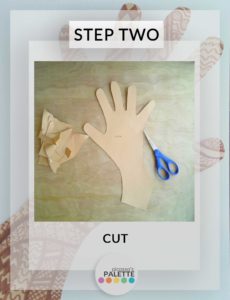
Next, the students cut on the traced line to create the hand shape. Then they decide which symbols to use.
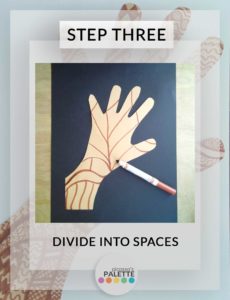
Once the students have practiced their patterns by repetitively drawing their symbols on scrap paper or in their sketchbooks, they divide the hand into spaces that will be covered by the patterns.
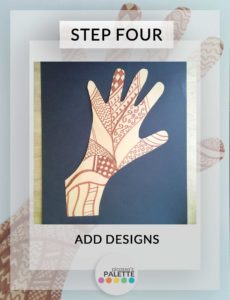
The spaces are filled using repetition of the symbols they’ve practiced, and other simple repetitive lines– zig zag, curvy and parallel.
SKILLS
The learner will practice
- Tracing using a template
- Cutting on a line
- Drawing with a marker
The skills emphasized in this lesson
- Increase spatial awareness
- Improve fine motor skills
TECHNIQUES
While creating this lesson, students improve technique by
- Determining line styles to create a motif
- Replicating line styles across a defined space
AGE LEVEL
This Henna Hands Art Lesson is designed for students in fourth grade but can be modified.
When teaching students of different ages levels, a variation on materials or an emphasis on an advanced technique can modify the project to be appropriate for your students’ capabilities.
CONCEPTS COVERED
Elements of Art
- Line (Line Styles)
- Shape (Symbol)
Principles of Design
- Pattern (Motif)
More ART LESSONS from ART TEACHER BLOGS
Metal Tooling Using Visual Texture, by Glitter Meets Glue
Bird Sculptures Using Tactile Texture, by Art is Basic
Dyed and Stamped Pillows, by Masterpiece Momma
Relief Printmaking and Colored Pencil, by Look Between the Lines
Mixed Media Hometown Scenes, by Expressive Monkey
Zen Doodle Pinch Pots, by Ms Artastic
Past and Future Mixed Media Hands Project, by A Space to Create Art