Through a unit focusing on abstract vs realistic art, I decided to provide the experience for my middle school students to try a still life for the very first time.
And WOW was I impressed!
Beginning Realism: First Scaled Still Life Project
First, I arranged a still life including glass bottles, jars and a candlestick holder over draped fabric. I shone the light of my retro overhead projector onto the still life so the contrast was more dramatic. This made it easier for them to notice the darkest darks and lightest lights.
Next, I invited the students to take a photograph on the classroom ipad from any angle. They were also allowed to rearrange the objects to their liking. Most left them the way they were.
To accommodate for time, I cropped the photos to a square shape, printed the photos in black and white and drew the grid directly onto the photo. For this step, I had to make sure the total area of the grid matched the total area of the paper, so yeah, a little math was involved… but I love to keep that side of my brain working!
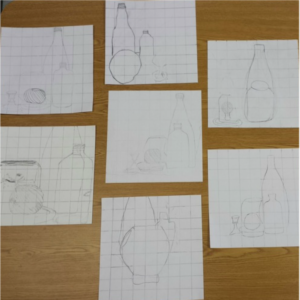
To begin our scaled transfer, we used the grid method to divide our square-shaped paper into 1×1 inch squares. Even the ruler use proved to be a challenge for some, but with assistance and a lot of discouraged sighs (from them, not me- promise!), they pushed through and accomplished this tedious task.
Then, I had to emphasize that the students drew each square exactly as it appeared in the photo. My students were used to the “eyeball” method, so many were instinctively just transferring the perceived shape without regard to scale. The best way I found to approach this was just to point out the differences between the box on the photo and the matching square on the grid. More frustrated sighs…learning new methods can be uncomfortable, but that’s a good thing, because we are stretching our minds!

So here you can see that the grid transfers ranged from primitive outlines to more expressive line drawing techniques. Some “got” it right away and started to blend their “eyeball” drawing instincts with their new skill of accuracy through grid transfer.
Now was a good time to mention to the students that realism takes TONS of hours, days, weeks, years of practice. Realism isn’t what every single artist does, that each has their own preferred technique of expression, and that it didn’t make them less ‘artistic’ if they didn’t take to this method with ease the very first time.
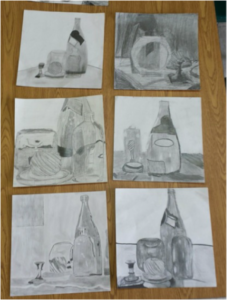
Next, we started to examine the values within the b&w photo. I recommended to the students that they find the darkest darks in their photos and work to progress to the lightest areas using gradation or abrupt contrast. Some chose to use tortillons or flexible erasers to blend the graphite. Others found they weren’t able to achieve the darkness of some areas, so I gave them the opportunity to use a charcoal stick once they had a varying range of values.

This is where it became so amazing to me to see the difference in artistic styles, even at the middle school age. I had to challenge my heavy handed students to add areas of highlights, and my light handed students to incorporate shadows.
I’d say, “not bad!” for their very first still life project! They were very proud of what they accomplished once they finished their drawings.
During closure, I reminded them of their lack of comfort during the challenging parts, and told them that their minds have to get a little uncomfortable to be able to change and adapt to learning new things, not just with drawing, but also in life 🙂