Printmaking in the Art Room sounds really messy and also sounds like a lot of work.
Which is exactly why I had avoided doing it as a class activity for years…
But, last year, I decided just to GO FOR IT!
Below I’ve written what works for me, and hopefully, you’ll be able to imitate some of this in your classroom, too.
Believe me, no matter how the prints turn out, the students are always impressed with the results!
Before Printing, the students create a design. In this case it was a LOGO to represent their viewpoint on a certain topic. The students can draw directly on the linoleum with permanent marker, pencil or pen. I prefer pencil. If they make a mistake, it usually can be removed by rubbing or smudging.
They must decide whether they want their design to be positive or negative space on the final print.
If positive space, they must remove the linoleum AROUND their lines for their design.
If negative space, they must remove the lines OF their design.
-
CARVE
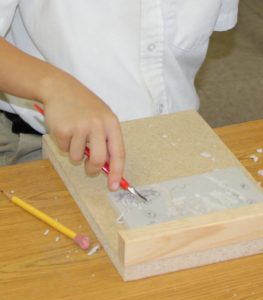
The first step after transferring the student’s design is to carve. On this particular project, we had some linoleum donated, along with some carving blocks and tools.
-
INK
The inking plate I use is just a scrap piece of a laminate counter, cut to square size. It’s perfectly smooth and sticky for loading ink onto a brayer. I squeeze or scoop out about a quarter sized dollop of ink, then roll it to spread with a brayer.Underneath is a piece of repurposed political signage on a foam board that I don’t mind getting destroyed.
I’ve discovered that some tables will just wipe clean with some disinfectant or baby wipes, depending on the type of ink used.
-
PRESS
Before pressing, their paper is labeled with their name on the back and the series on the bottom right. Then, they place their printing paper upside down over the carved design.
The student turns the paper over onto the fully inked plate, then rolls on the back with the clean brayer.
-
PULL
After I give it a strong once over to make sure all edges are pressed, I have the student pull the print very carefully and place it on the drying rack to dry.
Next, they come back to the station and use baby wipes to wipe their plate clean and also clean their fingers. There’s a garbage can right under my printmaking station for added convenience.
Voila!
All this used to intimidate me, but now I think printmaking’s a breeze… Cheers to pulling prints in the Art Room!