
Most of us are heading back to the classroom pretty soon- tidying up our rooms and refreshing the walls by incorporating a new theme or perhaps decorating with hot finds from the Target Dollar Bin.
And ya know what… at the beginning of the year, my classroom always looks SO NEAT starting out- all fresh and ready for creating!
But little by little, the “stuff” accumulates- and come May, every open shelf, flat surface and board is COVERED with projects and supplies!
Over the course of the school year, I tend to find things that I *should* have planned a spot to store, but forgot! Other things I’m glad I *actually* remembered to plan storage for ahead of time.
Now, I consider a few things that help me thoroughly think through all the storage for my classroom.
Project Storage
The first thing I decide every year is where to place the drying area for wet artwork/projects. I found that everything else gets determined by where the wet work goes.
For my classroom, the spot for my drying racks usually end up being close to the sink.
Next, I need a designated storage space for each student’s work. I keep their work-in-progress in drawers, grouped by class.
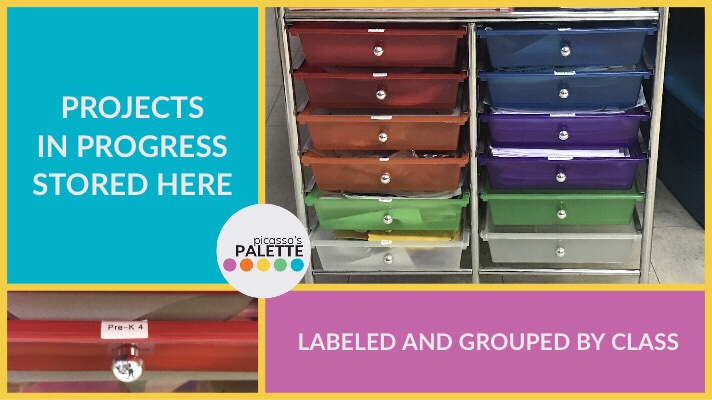
I use drawers to store each class’ work until the project is complete, then send it with their teachers- usually after it’s uploaded to the online art gallery, Artsonia.
For the older students, I have them store their finished work inside their portfolios.
I immediately think of 2D artwork, but I’ve always forgotten to designate storage for our 3D projects, which I wind up clearing off a shelf last minute… (Making a promise to myself that I will TRY to avoid that this year!)
For my project storage, I need labels. I have used everything from regular masking tape, to official labels printed on my (beloved) label maker.
And if it isn’t enough to have to find a safe place for every single student’s project, we also have the unique challenge of finding ways to store our supplies and materials.
Supplies Storage
A few weeks in to every year, I am reminded of my a love/hate relationship with the arrival of my supply order!
Those boxes of supplies come in like it’s Christmas morning, “YAY!”
But then, we are faced with trying to find a place for all of the stuff, “UGH!”
It really is a blessing and a curse!
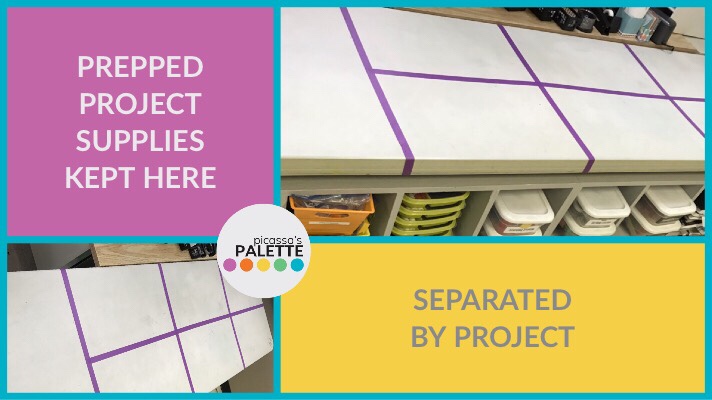
I’ve found that I first need to design a ‘staging’ area for the prepped supplies- you know, the precut cardstock or the special markers you only bring out for this specific project.
For student accessible storage, I keep markers, crayons, paper, etc on open shelving, grouped by material and categorized by warm, cool and neutral.
My drawing area is stocked with sharpened pencils, sharpeners and erasers. It’s in a spot local to my desk and the students’ desks.

Though most of my art room supplies are out for maximum student accessibility, I keep my extras in longer term storage area in a closet. Things like fingerpaint and liquid watercolor are located in a closet with shelves, inside clear boxes, which I have (mostly) labeled.
Materials Storage
In addition to keeping projects stored safe, I also need to keep my materials in “project-ready” condition.
But, I’ll admit- finding space for storing materials has been one of the trickier parts of teaching for me.
I like to have everything out and ready to go, so I found a few storage tricks to help me keep the materials I need for teaching art concepts close at hand.
I have SO MANY teacher made examples, which I have accumulated over the years. Those go in a plastic bin for longer term storage, but I have a smaller handled case to keep the next project’s examples ready to go. The current project’s examples are almost always displayed up on my whiteboard.
I haven’t always been the biggest fan of teacher made examples, but I find that I need my students to have a visual for the completed project to be able to visualize how each step will turn out.
What’s really wild is I haven’t used a smart board and document camera since I switched to my current school! So, when ordinarily, I’d display each step on the Elmo camera, instead I display the steps of the project, on the whiteboard. These steps are written out, and match with printed-out-and-copied-off direction sheets – an ‘old school’ paper handout.
I have file folders as storage for each class’ paper handouts. Nothin’ fancy here, folks! The folders, labeled by grade level, hold my student resources, directions, worksheets, etc.. anything that I’ve copied off specifically for that lesson.

Since, I don’t want to have to waste instructional time going across the classroom to pick up and distribute (Many times, I just put the copies on their tables ahead of time.) I keep that stash close to my whiteboard, where I give my demos and explanations. That type of direct teaching naturally leads to passing out the copies- so that’s the most convenient place to store.
Classroom Management
I truly believe that less movement and downtime leaves fewer opportunities for misbehavior, so I try to efficiently have project materials set out on the student tables before they arrive and pre-distribute the supplies in a bin given to each table.
Have you heard of Instructional Walls? I learned that it’s a way to maximize your wall space for learning. It includes things like Anchor Charts (fancy name for poster) and Word Walls in the regular ed classroom, but I still use this concept for display of my commonly taught routines, policies, objectives and techniques.
Teaching every student in the school absolutely has its pros and cons. I get to see the student in a different atmosphere, which sometimes allows them to shine, and other times gives them to show… ahem, a unique side of their personality.
But I find when I make my objectives clear, post my expectations and display the directions, it really makes a difference on the degree in which my students are productive and generally well-behaved when they come to the art room.
I’d love to see how you use some of these strategies in your classroom!
Let me know how it’s going…
Add #picassaspalette or tag me @picassaspalette on Instagram!
And, feel free to SHARE this post with fellow ART TEACHERS